| 【精选】【陆续排坑】解决conda下载速度慢的问题:更换国内源 | 您所在的位置:网站首页 › anaconda scipy库 › 【精选】【陆续排坑】解决conda下载速度慢的问题:更换国内源 |
【精选】【陆续排坑】解决conda下载速度慢的问题:更换国内源
|
序
写在前面,由于国内墙的原因,Conda下载安装包很慢,这里我们需要使用国内的镜像才能提高速度。 一、Win10 1、查看当前的下载源(初始)conda config --show
这里有三组国内源可供选择: 清华镜像: https://mirrors.tuna.tsinghua.edu.cn/anaconda/cloud/msys2/ https://mirrors.tuna.tsinghua.edu.cn/anaconda/cloud/conda-forge/ https://mirrors.tuna.tsinghua.edu.cn/anaconda/pkgs/free/ 中科大镜像: https://mirrors.ustc.edu.cn/anaconda/pkgs/main/ https://mirrors.ustc.edu.cn/anaconda/pkgs/free/ https://mirrors.ustc.edu.cn/anaconda/cloud/conda-forge/ 上海交大镜像: https://mirrors.sjtug.sjtu.edu.cn/anaconda/pkgs/main/ https://mirrors.sjtug.sjtu.edu.cn/anaconda/pkgs/free/ https://mirrors.sjtug.sjtu.edu.cn/anaconda/cloud/conda-forge/ 修改方法,以清华镜像为例: conda config --add channels https://mirrors.tuna.tsinghua.edu.cn/anaconda/pkgs/free/ conda config --add channels https://mirrors.tuna.tsinghua.edu.cn/anaconda/cloud/conda-forge conda config --add channels https://mirrors.tuna.tsinghua.edu.cn/anaconda/cloud/msys2/ # 设置搜索时显示通道地址 从channel中安装包时显示channel的url,这样就可以知道包的安装来源 conda config --set show_channel_urls yes然后再次运行conda config --show
至此,修改conda下载源为国内源已完成。 3、查看下载源配置文件运行conda config后可以在"C:\Users$你的用户名"(注:比如你的电脑叫小黄,此处就应为C:\Users\小黄)下面找到.condarc文件:
如果有一天,你发现当前的国内源不好用or突然不想用当前的国内源or你出国了,你想还原成之前的官方下载源,怎么办?只需运行下面的代码: conda config --remove-key channels 再次打开conda配置文件,你会看到之前的配置语句都消失了:
一切又回到目录1的情况 5、可能遇到的问题 1)无法定位程序输入点openssl_sk_new_reserve于动态链接库解决办法 channels: - https://mirrors.ustc.edu.cn/anaconda/pkgs/main/ - https://mirrors.ustc.edu.cn/anaconda/cloud/conda-forge/ - https://mirrors.tuna.tsinghua.edu.cn/anaconda/pkgs/free/ - defaults show_channel_urls: true如果你直接在.condarc文件里面的添加channels后,下载时可能会出现下面这个问题:
找到Anaconda安装目录,我的是“D:\anaconda”,下面的叙述会以此为主目录,不再说明 记\DLLs下libcrypto-1_1-x64.dll及libssl-1_1-x64.dll修改日期为A:
解决 二、 MacOS系统MacOS系统也会遇到下载慢、不能下载的问题,由于步骤跟Windows系统类似,这里只作简单介绍。 conda config --show
conda config --add channels https://mirrors.tuna.tsinghua.edu.cn/anaconda/pkgs/free/ conda config --add channels https://mirrors.tuna.tsinghua.edu.cn/anaconda/cloud/conda-forge conda config --add channels https://mirrors.tuna.tsinghua.edu.cn/anaconda/cloud/msys2/ #设置搜索时显示通道地址 从channel中安装包时显示channel的url,这样就可以知道包的安装来源 conda config --set show_channel_urls yes 修改完毕后发现生效:
与Windows不同的是,下载源配置文件在 “/Users/用户名/.condarc” 经多次验证,在cmd中修改下载源的操作,需要几秒钟的时间才能在.condarc文件中改动。 4、还原下载源同Windows conda config --remove-key channels 5、注:MacOS系统中,直接在condarc文件中添加channels不会报错,但有时依然会产生:
此时需要把condarc文件中的defaults手动删掉即可:
配置成功 三、排坑 1、问题:Win10 conda install时出现Solving environment: failed with initial frozen solve. Retrying with flexible solve.
解决方式: 找到.condarc文件,修改为:
时间:2020年12月8日17:07:30
解决方式: conda install cudnn=7.4.1 -c https://mirrors.tuna.tsinghua.edu.cn/anaconda/pkgs/main/linux-64/参考文章: https://www.cnblogs.com/yibeimingyue/p/13837929.html 3、问题:服务器(Centos7) conda install时出现Solving environment: failed with initial frozen solve. Retrying with flexible solve. 1)采用上一节的解决办法仍无效:
仍不行 3)conda update -n base conda参考文章: https://blog.csdn.net/weixin_41622348/article/details/100582862
conda update -n base conda
仍不行。 4)在国内源上面查找
cudnn和cuda版本对应关系: https://developer.nvidia.com/rdp/cudnn-archive#a-collapse742-10 成功解决。 4、问题:conda无法下载jupyter notebook
排查了很久发现可能是清华源不提供jupyter notebook了,至少是我没找到:
改为使用pip下载:
输入 pip install PyHamcrest解决 pip下载可能无法启动jupyter内核,还是改为conda下载,文件配置如下: ssl_verify: true channels: - http://mirrors.tuna.tsinghua.edu.cn/anaconda/pkgs/free/win-64/ - http://mirrors.tuna.tsinghua.edu.cn/anaconda/pkgs/main/win-64/ - http://mirrors.tuna.tsinghua.edu.cn/anaconda/cloud/conda-forge/win-64/ show_channel_urls: true
完成。 |
 一般来说,channels是默认defaults,也就是下面的repo.anaconda.com/XX,这个网址是需要翻墙访问的,否则会很慢,甚至报错。
 可以看到channels内容已经更改
 如果没有找到需要设置:
 打开后发现:
 是不是很熟悉,就是上面我们在命令行填入的国内源地址
 当然,我们也可以使用conda config --remove-key channels XXX移除指定的链接
 解决办法:
解决办法: 记\Library\bin下对应文件修改日期为B:
 用A和B时间较小的一方去替代另一方,我的例子里,A是2018年,B是2020年,所以用将A里面的文件复制到B里面(谨慎一点,可以在别的目录下多复制一份,防止操作失误):
 再来下载试试:


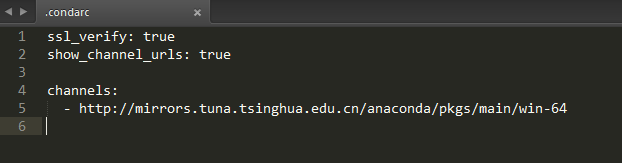 注意是“http”!,以及在后面加上“win-64”


 发现中间的版本断档了,所以改为下载7.6.0版本:


 可能出现下列问题:

【本文地址】